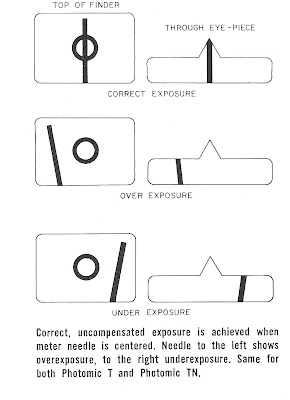
Sunday, May 31, 2009


I've been doing some high resolution scans of individual images on my contact sheets to get an idea of what the prints might look like before I try enlarging them. I thought the scans make interesting images in themselves and have qualities that would probably not transfer to conventional enlargements.


Winter in Loan Fir and Spring in my Garden


I finished a roll of film on friday that had images from last Winter. I made a contact sheet and created a folder for the set of negatives. The picture taken in Lone Fir where a light wet snow was melting away was printed on cold tone ilford fiber paper. The picture taken last weekend of a poppie was printed on warm tone ilford paper. The scans kind of exaggerate the differences which are much more subtle.

Tuesday, May 26, 2009


Carnivorous Plants; Sarracenia hybrids of alata,flava, leucophylla, oreophylla, and Dionaea muscipula.
I removed the plants from the growers peat and sand mix, carefully washed off the root system then planted in damp New Zealand Spaghnum placing the pots in a tray about an inch deep that I keep filled with distilled water. I always repot any plant I buy because it gives me a chance to study the root system and determine the health of the plant. If there are more live fresh roots then soil in the pot the plant has done well, if there is more soil then roots then something is not to the plants liking. These plants had pretty undeveloped root systems but after a summer growing in this Spaghnum their roots will fill the pot and the plants will get huge. You can't have one without the other. It's a very Zen approach.


I worked on my second print from my roll of film shot in Oaks Park last month. This picture had some interesting elements because I was able to include 3 rides in the composition but I wanted to bring out the sky a little better. The foreground required about 21 seconds at f16 using a 2 1/2 contrast filter for proper exposure but the sky needed an extra 9 seconds. I cut a crude mask to block the lower part to allow for some extra exposure for the sky but left the foreground alone. The mask covered up the sky between the spokes on one of the rides (slightly left of center) so next time I'll cut the mask to expose that ride with the sky and see if that works better.
I use an archival washer for all my prints that keeps the prints from clumping together while washing, and a hypo-clear bath such as perma-wash to cut down on washing time and save water. A dip in photo flo and then squeegee out the excess water, place the prints between blotter paper, then air dry on racks with nylon screening. Then I put the plants in a proper plant press for a couple of days to flatten them out. You have to do this last step if you work with fiber paper.


My first impressions of the pictures I took last month in Oaks Park are a tad low. The light wasn't all that cooperative but I discovered while shooting that working with the twin lens on a monopod gave me more flexibility then a tripod with similar stability. I also realized the advantages of the square format where one doesn't have to think about vertical or horizontal compositions. I also discovered when working with a waist level twin lens where you look down in to the camera while composing the shot people seem less aware that I was photographing them. Using a traditional camera like a SLR at eye level I've noticed makes people self-concious and aware that you are taking their picture and makes them react. I wished I'd worked with a faster film then Agfa 100 considering the overcast sky and low light that kept my exposures around f4 at 125th of a second. I worked yesterday on making a contact sheet and getting one fairly properly exposed print of what I thought initially was the most interesting negative. Since all of the negatives are of similar density I can use that print exposure time as the base point for the next test prints which will make the printing go a little faster with the next negative I select to work with. I did a high res scan of one image on the contact sheet and found this a pretty good way to evaluate the positive image. I selected the top image to work with next.

Sunday, May 24, 2009


I prefer to grow plants in pots, easier care and I can move them about easily to photograph. I am going to enjoy photographing the Pitcher plants. I haven't grown any for several years now. I take them out of the peat, perlite and sand mix they are planted in and plant them in fresh New Zealand Sphagnum, and have them in a tray of distilled water. Normally I use plastic pots but I want these to fit in with all my other front porch plants in terra cotta.


Been a busy weekend between lawn mowing and some gardening managed to develop a roll of film. A roll of Agfa 100 developed in Rodinal 50:1 dilution. The darkroom was still a little cool in the morning so development time was 23 minutes. I use a water rinse between developer and fixer. After washing the negatives, a dip in photo flo I hang them up to dry. Once completely dry I cut them into 4 negative strips to fit in glassine envelopes for protection. I always produce a contact sheet to store with the negatives. I also have a small illumination board or light table and loupe to look at the negatives to evaluate before making any enlargements. I select one negative to work on fine tuning exposure and contrast.


This is another rangefinder that intrigues me, Konica S2. Love the ad from the 1960's. Camera cost a little less then 150.00 back then. The equivalent of around 500.00 today. A model in pristine condition probably could still sell today for almost as much as it sold for back then. This camera reminds me very much of the Mamiya Sekor Super Deluxe that I used in High School.
It has just the level of technology I want. A mechanical rather then electric shutter, all manual operation with only the cds meter requiring a battery. The lens is a 1.8 with above the lens metering that will allow metering while a filter is over the camera lens just like the Canonets. A nice one sells for between 50-75 rather then the 75-100+ that the Canonet sells for. Not as many on the market as the Canonet but not rare either.

Saturday, May 23, 2009


Yesterday I went to Citizens Photo searching for some possible bulb replacements for the spot light and found this really clean old enamel print tray. These usually get chipped over time and are harder to find and more expensive then good old stainless steel. I hate plastic trays.

Friday, May 22, 2009


Trying out the new lights. My camera choice was my Nikkormat FTN, attached to a PB-4 bellows with a 105 f4 nikkor bellows lens. I worked with some very slow Agfa 25 black and white film for pictures of this amazing Poppy I found at Portland Nursery today. I have grown this varietal form before, Champagne Bubbles, but have never seen one with flowers this large. Lots of buds so I should be able to get plenty more pictures in the near future. I worked with a white background from an old projection screen without any back lighting trying to take advantage of the shadows. Over the weekend I'll work on some color using strobe lights and more black and white with various backgrounds and strobe lighting. This new spot light should be fine for black and white work but not color film. I shot the color pictures with an inexpensive digital camera. I think there is an in camera control on the digital camera to balance the image for incandescent lighting but I wasn't really trying to photograph with the digital camera so I didn't try to figure it out.


This is the first time in a long time I worked with continuous lighting rather then strobes. It was a bit easier because I was able to use the camera light meter. Also the lights were not connected to the camera through the sync cord which made them easier to move around. I kept worrying though about the bulb on the spot burning out and I still can't find just the right replacement bulb.

Sunday, May 17, 2009


More photos using my Sun Ray. This should work pretty well for botanical work in black and white. The old bulb is not balanced for outdoor color film so images tend towards the red end of the spectrum. The huge projection bulb, 500watts will probably be difficult to find replacements for. The stand though is nice and sturdy and can be raised higher then my basement allows. With some additional lighting from strobes and reflectors for fill lights I should be able to do some interesting work with it.

Saturday, May 16, 2009


Another Hollywood Camera find.


This great old spot light with an excellent stand. Took it apart today and cleaned it and replaced the electrical cord. It's probably at least 60 years old.


In writing on the early 60's-70's Japanese Rangefinders I've been thinking about buying one on e-bay. Okay I am going to buy one on e-bay. Trying to follow my own advice I've settled on a few interesting models based on availablility. So far the easiest one to find appears to be the Canon Canonet G-III 17. Prices are ranging from 9.99 to someone trying to sell one for 229.00 (good luck with that). The camera had many, many permutations from the earliest models that came out when Kennedy was still president to the time "Watergate" entered the modern lexicon. This is a good thing because I can look along the tech spectrum for that model that balances just the right amount of technology with reliability and retaining manual control. The "greenest" model would probably be the first one which used the selenium cell "solar powered" light meter which requires no battery but means it only works effectively outdoors in bright light. A friend once gave me their fathers old 35mm camera with such a meter. The camera was probably from the 50's and the meter still read accurate when checked against my hand held light meter. Later models went with Cds which used a mercury battery for a power source and boosted the sensitivity of the meter to read in lower light conditions. Problems with old Cds meters have to do with the unavailablility of the mercury batteries that these cameras were designed for and what current battery options are available that allow functionality with a minimum of tweaking. This particular model does use the same type batteries that I can make work with all my current Nikon cameras but I also have a hand held light meter that I can use to periodically check meter accuracy.
The numbers like 17 or 28 refer to the fastest lens apeture. So the Canonet model 17 has a 1.7 lens the Canonet model 28 a 2.8. The latter model was the camera of choice of the young photographer in one of my favorite movies Pecker by John Waters. This film was one of the small bits of inspiration that made me want to return to photography.


Saturday, May 09, 2009

In camera light meters.


It should be stated here that the type of cameras I will be discussing are pretty much all made 30-40 years ago when cameras were for the most part entirely mechanical with no need for a battery except to power a CdS light meter. I have posted here an illustration from the Nikon Handbook giving examples of the typical indicator in a camera lightmeter that informs you when you have the proper exposure for the film you are using.

For those not versed in analog photography in the pre-auto- indexed, auto-focus era it helps to understand two factors in film exposure. One is Apeture controlled by a camera diaphragm which relates to the volume of light coming through the lens. It is measured by a series of f stops each one being twice as large as the one preceding it. The largest apeture opening has the smallest number and they go something like this; f1.4, 2, 2.8, 3.5, 4, 5.6, 8, 11, 16, 22, 32, 45. f1.4 lets in twice as much light as f2, f2 twice as much light as f2.8 and so on. The second factor in exposure is shutter speed which regulates the duration of exposure and again each number is twice as fast as the one before it and they go something like this on most cameras going from slowest to fastest, 1 second, 1/2 (of a ) second, 1/4, 1/8, 1/15, 1/30, 1/60, 1/125, 1/250, 1/500, 1/1000, 1/2000. So if you were to make an exposure of 1/125 of a second at f16, you could make the exact same exposure with 1/250 of a second at f11 or 1/60th of a second at f22. Exact same exposure but not exact picture since each change in shutter speed and apeture will have an impact on the image.

You know a light meter is functioning if it correctly demonstrates this factor. If you were to look through a camera to see if its light meter was functioning properly manipulate the apeture and shutter speed until the needle is centered and then change the apeture to one stop larger or smaller you would have to also make a comparable change in the shutter speed to return the needle to center. Using the example above if you were able to center the meter at a shutter speed of 1/125th of a second at apeture setting f16 if you doubled the exposure by slowing the shutter speed to 1/60th you would have to halve the the volume of light by changing the apeture setting to f22. Set the shutter speed twice as fast to 1/250th of a second you would have to double the volume of light by changing the apeture setting to f11.

Knowing this rule we can test a light meter if it works and is there for functional if it can pass this test. The needle should move smoothly and stay in place when we have settled on one setting of apeture and exposure. It may not be giving us an accurate exposure but at least we know the meter is working and can be calibrated to give an accurate exposure.


Friday, May 08, 2009


The 35mm Rangefinder

The first 35mm camera I ever worked with was a rangefinder. First my Mothers Argus C-3 and then when I was taking my first photo classes in High School back in 1968 a Mamiya/Sekor like the one pictured. The 35mm rangefinder, with built in lightmeter and a lens that can be focused by a coupled rangefinder is a serious camera and was the choice of some of the 20th centuries greatest photographers, Henri-Cartier-Brisson for one. In the 1960's all of the major Japanese camera makers manufactured models with built in light meters that were reasonably priced compared to the more expensive SLR's (Single Lens Reflex) and probably dominated the market of the emerging serious amateur photographer. Now days though few of these beautiful little cameras still exist in full operating condition. They are difficult but not impossible to find and can usually be purchased for a price in the 75-150 dollar range. The ones I am primarily talking about do not have interchangeable lenses but the lenses they do have are usually a focal length between 40mm-50mm, a nice compromise between a wide angle and the boring standard 50mm lens that SLR's are usually coupled with.


Look for a model that has a fully focusable lens, not a "zone focus"where you preset the lens for usually three settings; close-up which is about 2 feet from the camera, mid-range which is about 2-6 feet and Infinity for landscapes. A coupled rangefinder camera has actually three lenses; one for taking the picture, and two for focusing. The two lenses super impose two views from two different perspectives of what is in front of the camera. When viewing it looks a bit like you are looking at something cross eyed. To focus the lens you align the image in the center split image screen which comes from one of the lenses with the image outside of the center screen which comes from the other. It takes some getting used to in part because when you look through the viewfinder everything is in focus unlike a focusing system that utilizes the camera lens. Look for Japanese made models not anything from Russia or East Germany because they are crap. Try to shop around and find as many different kinds of models as you can and see how they feel, also research online sites about vintage cameras, old books and magazines from the 60's and early 70's when most were manufactured. Once you have settled on model(s) that you like try to find one that is still in fine working condition. If you are buying from a private party see if they will meet with you at a camera repair service to have the camera examined by someone who understands old cameras. If you are buying one from a used camera shop be sure to find out the conditions of returning the item if you are not satisfied with it. Most used cameras stores are selling on an "as is" basis and in a very narrow market so if they can get cash for a camera they are reluctant to give it back so ask questions. If you can develop a relationship of trust with a seller they may let you borrow the camera and try it out. You can also shoot a roll of film through the camera usually outside the store and take the film in for development. Slide film is best for this purpose. Slides will help you check out the quality of the images and if the light meter is reading correctly and the shutter works properly. Camera Solutions on Macadam Ave. is a repair service which also sells reconditioned older cameras. Pricey but at least you can buy with a certain amount of confidence. Just about any old camera you buy, if it is in repairable condition will cost in the range of 150-200 to be totally overhauled so one has to make the decision if buying a camera that at it's best is only worth a 150-200 is worth that kind of investment. You may recover some of your money because a well made fully functioning camera from the era of film cameras still has a market with real photographers and collectors but usually they are looking for pristine examples with all the packaging and instruction books.


I own a Minolta CL built in the late 70's as a more modest answer to the expensive Leica M5 rangefinder cameras with interchangeable lenses and through the lens metering (TTL) like an SLR. They were also the smallest Leica rangefinder ever built. I find now in my old age the small focusing screen at the center difficult to use especially in low light conditions. The camera though is a favorite of mine because of it's small size and the high quality of the images. They are expensive though and collectible so they are not a modestly priced camera but still cheaper then a "real Leica".


I have bought several cameras on e-bay and have been satisfied with the results but when I buy a camera on e-bay I calculate the possible 150-200 repair costs in to the price. Also when looking at old cameras one has to consider the number of units manufactured because that will determine the price of parts for repair. Look for models that are well represented. Also it helps if the seller deals in cameras and knows what he is selling. Some sellers will offer cameras that have been overhauled but find out what was done since to some people overhauling consists of replacing light seals or gaskets and blowing out the inside with a can of compressed air.


The rangefinder is no longer the introductory film camera it once was but is still a very viable option but research is essential. This is where old photo books and magazines from the 60's and 70's can be very useful. Before I go on to the 35mm SLR I am going to post some info on the nature of old in-camera light meters and the differences between functional and accurate.
Web Statistics